Upload Files Help Guide
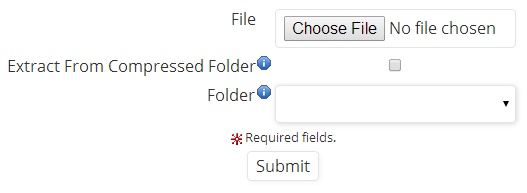 File
File
- Login to your website
- Go to Content Management > Upload File
- Click Browse or Choose File and select the file you want to upload from your documents
- Check Extract From Compressed Folder if the file is compressed and you wish to unzip it
- Select a folder location from the drop down, leave blank to upload to the root file folder
- Click Submit
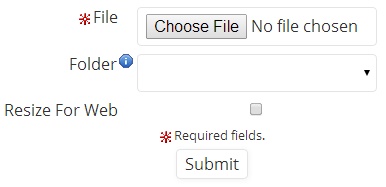 Image
Image
- Go to Content Management > Upload Image
- Click Browse or Choose File and select the image from your documents that you wish to upload
- Choose the location to place the image from the Folder drop down selection (leave blank if you wish to place the image in the root images folder)
- Tick the Resize for Web box if the file size is large
- Click Submit
If you recieve an error saying "Maximum request length exceeded" it means that the file is too large to be uploaded onto the server. Follow these steps to resize an image before uploading (for Windows operating systems):
- Find your image in Windows Explorer
- Right click the image and click Edit (this will open it up in Paint)
- Click Resize in the toolbar
- Change the option from percentage to pixels
- Type a number in Width (800px is usually the standard for a web sized image)
- Height will auto adjust
- Click OK and save the image
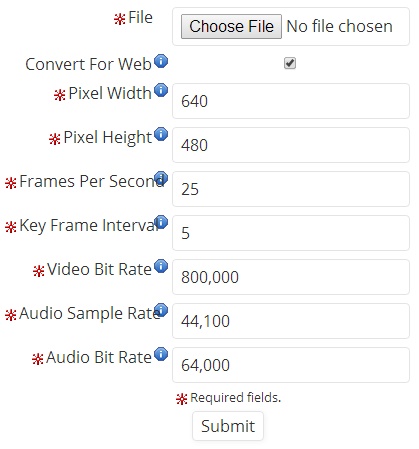 Video
Video
- Go to Content Management > Upload Video
- Click Browse or Choose File and select the video from your documents
- Keep Convert To Web ticked if the video is not already resized for the web
- Choose a width and height (measured in pixels)
- Some video standard sizes include:
- 16:9 aspect ratio: 768 x 432, 640 x 360, 320 x 180
- 4:3 aspect ratio: 640 x 480, 480 x 360, 320 x 240
- Click Submit
If an error comes up saying “Access to path is denied” when trying to upload a file, image or video please contact your developer so they can fix the issue.
